the course
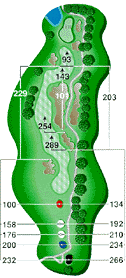
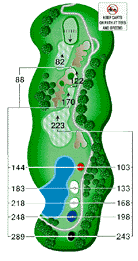
Since opening for the 1998 season, the Apple Mountain golf course has been consistently recognized as one of Michigan’s premier courses. Masterfully designed by John Sanford, this par-72 championship layout challenges—and delights—golfers of all ages and skill levels. The course features four sets of tee boxes, generous fairways, true greens, and spectacular views.
“The playing conditions are perfect at Apple Mountain.”
Hole 1 - Par 4
381 – 356 – 329 – 288
A relatively easy opening par 4 with a gentle dogleg to the right. Favor the left-center of the fairway off the tee to set up a clear look at the green on your approach.
Hole 2 - Par 5
527 – 489 – 460 – 405
This hole demands precision from tee to green. Water lines the entire right side, while a series of bunkers on the left eliminates any safe bailout. Deep, penal bunkers guard the green, ready to punish even slightly errant approach shots.
Hole 3 - Par 4
360 – 343 – 307 – 272
Longer hitters should choose a 3-wood or long iron off the tee to avoid the pond straight ahead. Aim for the center of the green regardless of pin position.
Hole 4 - Par 4
396 – 366 – 295 – 276
While this hole presents a good birdie opportunity, it demands precision. Avoid the wetlands to the right, and be sure to select the proper club when playing into the usual prevailing wind.
Hole 5 - Par 3
171 – 156 – 136 – 114
The first of two holes played from the mountaintop. Careful club selection is essential, as the elevated tee causes the hole to play shorter than the yardage suggests. Numerous slopes and subtle breaks on the green ensure that no putt is a gimme.
Hole 6 - Par 4
425 – 405 – 383 – 262
Don’t let the view distract you—an accurate tee shot is essential on this hole. Aim for the center of the fairway to avoid the second wetland. A forgiving green rewards a solid approach and can present a rare birdie opportunity.
Hole 7 - Par 3
169 – 139 – 122 – 104
All shots should clear the waste area; however, be cautious—long shots may roll off the back of the green into the pond.
Hole 8 - Par 4
463 – 410 – 371 – 315
This hole requires both length and precision. Watch out for the water hazard on the right and the hidden water on the left, not visible from the tee. Careful club selection is essential due to the bunkers guarding the green.
Hole 9 - Par 4
393 – 348 – 326 – 288
A traditionally styled hole to cap off your front nine. Accuracy off the tee matters more than distance. Make sure to choose enough club for your uphill approach shot.
Hole 10 - Par 4
403 – 372 – 343 – 298
Welcome to the back nine. A subtle dogleg left requires a precise tee shot to steer clear of the strategically positioned bunkers on the left. Keep an eye out for the creek that crosses in front of the green.
Hole 11 - Par 3
165 – 139 – 119 – 93
The shortest of the four par-3s, yet highly challenging. The right side of the green is significantly elevated compared to the left, making a par here an impressive achievement.
Hole 12 - Par 5
563 – 532 – 509 – 434
Longer hitters should aim their tee shots over the left-hand bunker to capitalize on the downhill roll. Watch out for the extensive waste bunkers stretching along the right side. Be sure to carefully check your yardage on the approach, as the green is exceptionally long.
Hole 13 - Par 4
461 – 415 – 388 – 314
This hole requires both distance and precision. A fairway bunker guards the right side, while a waste area starts on the left. To reach the expansive, two-tiered green, long and accurate second shots are essential.
Hole 14 - Par 4
353 – 337 – 314 – 269
Many players opt for an iron off the tee, as missing the fairway here usually leads to a bogey. Approach shots require caution, with a shallow green protected by bunkers in front.
Hole 15 - Par 5
583 – 524 – 498 – 439
Distance off the tee is not a key factor on this hole, as all players are expected to reach the green in three shots. Large bunkers guard both sides of the landing areas as well as the right side of the green. Be cautious of the hidden pond on the left side of the fairway when playing your second shot.
Hole 16 - Par 3
215 – 167 – 151 – 113
This long, straight par-3 may seem like an easy shot, but even small errors can be costly. Choose enough club to reach the green and focus on accuracy, or you could end up scrambling for par from a bunker once more.
Hole 17 - Par 4
413 – 363 – 336 – 292
This is the only hole on the course without a bunker. Watch out for the water on the left, which is not visible from the tee. Any shots that miss the green to the right may roll down the embankment and could end up in the water.
Hole 18 - Par 5
506 – 476 – 421 – 390
The shortest of the four par 5s presents a true test from tee to green. Long hitters may hesitate to go for an eagle due to the water guarding the front of the green. When laying up, take caution—water lurks just in front of the central fairway bunker.


